Thursday 28 February 2013

I hope I taste 'cracking'

Just a quick up date of some of the things I've got up to this week. 
First of all to explain the title this week I drew faces on the 22 eggs in the fridge, not too sure why. It got to making a frittata for lunch and my parents were forced to become murderers as they killed off 6 of the innocent eggs! 


 I also drew a birthday card for my Grandma to give to her friend of a hungarian vizsla eating a black leather wallet as apparently that's just what the dog did to his old wallet. Luckily his Birthday present was a new one was to be a new one... until the dog got hold of it!

And one more Birthday, I felted two cumbrian sheep onto a green felt purse for a friend. It was really cheap and simple as the plain purse only cost £3 and you could put a far more intricate design on it if you chose but I thought I'd keep it simple. 
Thanks for reading! 


Sunday 24 February 2013

Buttons, buttons and more buttons!

As a matter of policy each and every family should have a jar or box of buttons (if you don't yet have one I suggest you get collecting those buttons). A jar of buttons is a beautiful thing to have because, in my opinion, buttons are just beautiful! They come in all different shapes, sizes, colours and patterns, they're all so different from one another. The sad thing about buttons is that there is a finite amount of space on a shirt to sew them, as the cockneys found with their pearl button suits, you get to a point where you have no space left for a button! This is when you need some extra ideas and that's where I can help. Today I've made four different things with buttons just for you, enjoy!


The family button jar and child
1.) The Button Ring


  • (first picture) You will need- some thin wire, something to cut the wire, a tape measure and some buttons (two holes or a shank button)
  • cut the wire to 50 to 60 cms
  • (second picture) put each end of the wire through the hole in the button and continue going round your finger and through the holes until you have about 10 cms of wire left
  • take the ring off your finger and twist it round and around the wire, finish by tucking it in
  • you now have a finished ring! 


2.) The Brooch


  • (first picture) you will need- some felt, scissors, a tape measure, a big button, a safety pin, thread and needle 
  • cut a square of felt, I made mine 10cms x 10 cms but you might want to make it a little smaller
  • (second picture) from each corner cut almost to the middle but not quite, stop about 2 cms from the centre
  • (third picture) bring each corner into the centre and sew in place
  • (forth picture) sew on the safety pin to the back and button on the front
  • Ta daah! 


3.) A Button Bobble


For this tutorial you need a thin bobble but I only realised mine were to big before making it and, living in a little town as I do, no shops are open on Sundays! I know you shouldn't put bobble in your hair but for this I had too, I do suggest you use a thin bobble. I think this is great for all those gold sailor skank buttons you get piling up. 
  • (first picture) You will need- a skank button and a bobble (that's it!)
  • (bottom left picture) put the bobble through the hole 
  • (right picture) pull the other end back through the loop
  • Short and Sweet!

4.) Button Clips 


  • (first picture) you will need- hair pins (AKA bobble pins), buttons with any number of holes, needle and thread
  • (second picture) thread the needle and tie it in a double or triple knot through the button
  • keep going round and through the holes with the thread (forget the clip for now!) You need to do it quite loosely so you can fit the pin head through, when finished tie it in a double knot
  • (third picture) push the thread on the back of the button through the pin
  • beautiful vintage clips, cheap and cheerful!

I hope I've inspired you to get collecting buttons or stop sewing them onto suits and shirts, do something useful with them! They make quick and beautiful presents of just treats for yourself and look really nice and vintage if you use the right buttons. I had another idea for a tutorial but didn't have time but I was inspired by my Mum's button bracelet which I've loved to play with since I was little. Here's a picture and leave me a comment or send me a link if you have an idea on how to make it, thank you!


Monday 11 February 2013

Our two day break to York

Yesterday me, my Mum and Dad drove for just over two hours through sleet, snow and rain at three degrees to get to one of our favourite cities: York. I have to say most of yesterday it rained and was freezing cold so we started the holiday off at a lovely little cafe with sheet music covering the walls, soup, a sandwich and for me a hot chocolate to pull we through the harsh weather. 
We spent most of the afternoon safe inside at the castle museum and went to a few shops as the wind died down. We spent a while looking for a place for tea but finely settled back at our all time family favourite of Pizza Express, you can't go wrong! All three of us managed to stomach three courses, even after an anti-pasti to share and four seasons pizza I still found space for a chocolate glory (vanilla ice cream with chunks of chocolate fudge cake and chocolate sauce). 
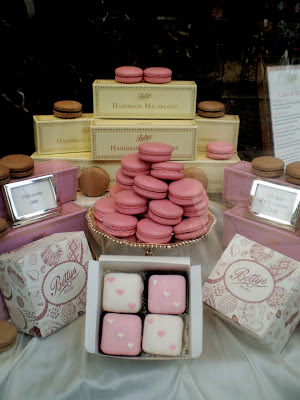
macaroons and fondant fancies in Betty's YorkToday the weather's been a lot better so we went round the shambles and a few of the quirky narrow streets to look at some of the shops, along the castle wall, which surrounds centre of the city, and to the Yorkshire museum before going to Betty's
If you've never been to Betty's you need to. We went at twelve O'clock and narrowly avoided having to queue outside the door on a Monday, not in the holidays! I can tell you it really was worth it though, I had a potato rosti with spinach, ham and a poached egg then a cherry frangipane with berries and even a fondant fancy (it was a treat as there are only three in the country, all in Yorkshire!). 

Saturday 9 February 2013

Valentine's day Guinness cakes and card

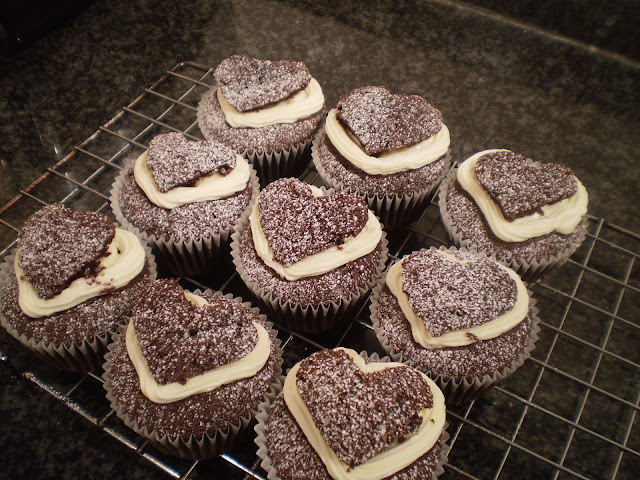
 Well as valentine's day is coming round the corner I thought it might be appropriate to do a valentine's post, even though I sadly don't have one myself. One thing I'm certain of though is that men like beer and women like chocolate, so why not put the two together? Today me and my Mum have been baking chocolate and Guinness cakes, the reason they're called cakes and not cupcakes is because we baked them in a muffin tin in muffin moulds but with cake mix so it seemed more appropriate. They were reasonably simple, the only vaguely difficult part was heating, and taste so good they'll be sure to win over your valentines! 

chocolate Guinness cupcakes decorated for valentines day

Chocolate Guinness Cakes 

(makes 12 muffin sized cupcakes)

we adapted the recipe from Nigella's chocolate Guinness cake


 Ingredients

  • 125ml Guinness
  • 125 grams of butter (cubed)
  • 40 grams of cocoa powder
  • 200 grams of caster sugar 
  • 70 ml of sour cream
  • 1 egg
  • 1/2 tablespoon of vanilla extract
  • 140 grams of plain flour
  • 1 1/4 teaspoons of bicarbonate of soda

  • 50 grams of softened butter
  • 100 grams of icing sugar
  • 1 200 gram tub of Philadelphia

1.) Preheat the oven to gas mark 4/180°C and line a 12 muffin tin      with cases
2.) Put the Guinness into a pan and put on a low heat before adding the butter, stir until melted. Add the cocoa and sugar and whisk together before taking off the heat.
3.) In a separate mixing bowl whisk the soured cream, egg and vanilla. Add the Guinness mixture (it doesn't have to have cooled) and whisk together.
4.) Add in the plain flour and bicarb, whisk again until the mixture is smooth with no lumps.
5.) pour the mixture into the cases and bake for about 20 minutes until they spring back when pressed and leave to cool.

6.) For the icing whisk together the icing sugar and butter until smooth before adding about 100 grams of cream cheese. If you like your icing sweet I suggest you stop there and it may be a little runny to pipe. If you want to pipe the icing you might have to add the whole tub like I did.
7.) Next cut out heart shapes from the top of each cake, as though making fairy cakes, and pipe the icing underneath before replacing the heart.
8.) enjoy while you create your valentine's card!


Adaptations

chocoholic? For even more chocolaty flavor add some melted white chocolate to the icing.
feeling guilty? Add some fresh or frozen raspberries to the cake mixture.


Simple and sophisticated Valentine's card


This card was just as simple as the cakes but looks really really nice and classy I think. All you need to make it is:
 1 sheet of white card
 1 sheet of coloured paper (I used red)
 Glue and glitter
 A craft knife and chopping board
 A black pen and pencil


1.) Take your white card and draw a large heart with a smaller heart within it on the top 1/3 like on the photograph. Cut out the hatched area with the craft knife on the chopping board.
2.) On the red paper in the exact same place as on the white card draw a big heart, glue around it and cover with glitter before shaking to remove any excess.
3.) Fold the paper and card in half before glueing the red paper inside, you might want to cut it a little smaller than the card so it fits in nicely.
4.) Write your message on the front and inside with the pen and send to your valentine's!


I hope you enjoy your cake, your valentine enjoys their card and you get one in return, happy Valentine's!